使用 Sitecore Install Framework 安装 Sitecore 9
引用
https://dev.sitecore.net/Downloads
how-to-install-sitecore-9-with-the-sitecore-install-framework
https://community.sitecore.net/developers/f/5/t/8278
https://www.norconex.com/how-to-run-solr5-as-a-service-on-windows/
compatability-issues-between-sitecore-8-2-and-solr-7-1
https://bitbucket.org/RAhnemann/sif-less/overview
https://jammykam.wordpress.com/2017/10/17/sitecore-9-is-here/
介绍
本文主要介绍在使用Sitecore Install Framework 安装 Sitecore 9 过程中遇到的问题及解决方法,
公司最近要做一个新的 sitecore 项目,可能需要使用最新的 Sitecore 9, 所以需要我先熟悉一下,在网上看看,
Sitecore 9 的安装方式和以前不一样了,以前的版本都是一个EXE文件,直接运行安装就可以了,
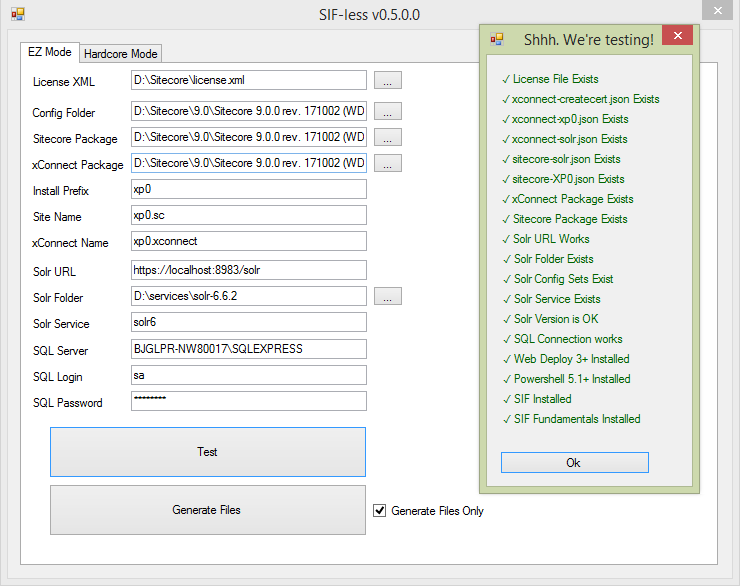
但 Sitecore 9 需要使用 Powershell 脚本安装. 不过有人写了一个SIF-less工具帮助安装人员快速检测环境是否准备完成。
安装文件
- Sitecore 官方下载,默认你已经下载了Sitecore安装包及License文件.
在这里使用xp0安装包(Packages for XP Single [XP0] Instance configuration). - SIF-less 下载
- Solr 下载
- NESS 下载
本机安装环境
- IIS 8.5
- Windows 8.1 x64
- .NET Framework 4.6.2
- Microsoft SQL Server 2014 SP2:This version only supports XM databases and does not support the Experience Database (xDB)
安装准备
- 检测 Powershell 版本, 请确保版本在5.1以上, 以管理员身份运行Powershell, 输入
$PSVersionTable返回结果如下:
Name                           Value
----                           -----
PSVersion                      5.1.14409.1005
PSEdition                      Desktop
PSCompatibleVersions           {1.0, 2.0, 3.0, 4.0...}
BuildVersion                   10.0.14409.1005
CLRVersion                     4.0.30319.42000
WSManStackVersion              3.0
PSRemotingProtocolVersion      2.3
SerializationVersion           1.1.0.1
- Solr 说明
Sitecore 9 的安装文档上说是支持Solr-6.6.1及以后的版本, 但是6.6.1 有一个BUG how-to-install-sitecore-9-with-the-sitecore-install-framework 文中最后有解释.
我下载了最新的Solr-7.1 安装过程各种坑, 最后出现 "Data at the root level is invalid. Line 1, position 1." 错误, compatability-issues-between-sitecore-8-2-and-solr-7-1,
大家说应该是 Sitecore 9 还没有支持Solr-7.1, Solr-7.1默认返回的格式是JSON, 而Solr-6.6.2大部分默认返回的格式是XML,
从错误信息看出Sitecore 默认Solr返回的结果是XML格式, 直接解析, 但是Solr-7.1默认返回的是JSON, 所以会出现上面的错误.
最后推荐大家使用Solr-6.6.2版本.
Solr启用https请参考: https://lucene.apache.org/solr/guide/6_6/enabling-ssl.html - 把Solr注册成Windows服务, 请参考how-to-run-solr5-as-a-service-on-windows
- 安装SitecoreInstallFramework, 在Powershell中运行以下命令
# Add the Sitecore MyGet repository to PowerShell
Register-PSRepository -Name SitecoreGallery -SourceLocation https://sitecore.myget.org/F/sc-powershell/api/v2

# Install the Sitecore Install Framwork module
Install-Module SitecoreInstallFramework
使用SIF-less 检测环境
SIF-less 可以快速检测我们的环境是否准备完成, 运行SIFless, 输入相关的数据,点击测试.

如果没有全部通过,请修改相关部分,其中一点如果你安装的是Solr-7.1版本, Solr Version 是不会通过,因为solr-7.1默认返回的JSON, 但是代码是按照XML解析的,
如果全部通过就可以准备安装了, 点击Generate Files 会在SIFless当前目录生成Powershell脚本文件.
问题及解决
- 证书错误 windows 8.1(windows server 2012 R2) PKI模块有问题, 详细错误信息如下:
PS>TerminatingError(Get-Command): "The running command stopped because the preference variable "ErrorActionPreference" or common parameter is set to Stop: No matching commands include a parameter named 'Signer'. Check the spelling of the parameter name, and then try again.
Parameter name: Signer"
>> TerminatingError(Get-Command): "The running command stopped because the preference variable "ErrorActionPreference" or common parameter is set to Stop: No matching commands include a parameter named 'Signer'. Check the spelling of the parameter name, and then try again.
Parameter name: Signer"
Install-SitecoreConfiguration : No matching commands include a parameter named 'Signer'. Check the spelling of the
parameter name, and then try again.
Parameter name: Signer
解决方法是在其它电脑上生成证书, 再把证书导入本机, (可以测试windows 10, windows server 2016), 并不是每一台都能成功,
我测试了一台windows server 2016 和一台windows 10, 都没有成功, 并提示相同的错误(这个没有找到解决方法),
2017-11-22 更新
已经成功在windows server 2016上安装成功, 可能是windows server 2016 是新安装的系统,可能缺少什么, 连IIS都没安装, 就直接安装证书,
后来把一些基础的都安装完成之后, 就可以正常安装证书了.
Install-SitecoreConfiguration : The 'Install-SitecoreConfiguration' command was found in the module
'SitecoreInstallFramework', but the module could not be loaded. For more information, run 'Import-Module
SitecoreInstallFramework'.
At C:\sitecore9\install-cert.ps1:23 char:1
+ Install-SitecoreConfiguration @certParams -Verbose
+ ~~~~~~~~~~~~~~~~~~~~~~~~~~~~~
    + CategoryInfo          : ObjectNotFound: (Install-SitecoreConfiguration:String) [], CommandNotFoundException
    + FullyQualifiedErrorId : CouldNotAutoloadMatchingModule
最后我在一台安装时间相对长的windows10安装成功了.
需要文件xconnect-createcert.json 和脚本insert-cert.ps1内容如下:
#define parameters
$prefix = "xp0"
$PSScriptRoot = "C:\sitecore9"
$XConnectCollectionService = "$prefix.xconnect"
$sitecoreSiteName = "xp0.sc"

Write-Host "$prefix.xconnect_client"

#install client certificate for xconnect
$certParams =
@{
Path = "$PSScriptRoot\xconnect-createcert.json"
CertificateName = "$prefix.xconnect"
}
Install-SitecoreConfiguration @certParams -Verbose
安装过程需要两这个证书,所以这个脚本需要执行两次,只是证书的文称不一样,我的证书名称为xp0.xconnect 和 xp0.xconnect_client.
生成的证书会在Local Computer > Personal > Certificates 下, 把它们连同private key 一起导出即可. 然后安装到目标机器上,
这时我们就可以在目标机器上跳过安装证书这个步骤.注释安装脚本语句:Install-SitecoreConfiguration @certParams -Verbose
此时还要修改xconnect-xp0.json文件, 在Parameters的SSLCert节点下添加"DefaultValue": "xp0.connect"
修改后如下:
"SSLCert": {
    "Type": "string",
    "Description": "The certificate to use for HTTPS web bindings. Provide the name or the thumbprint. If not provided a certificate will be generated.",
    "DefaultValue": "xp0.connect"
}
xp0.connect这个证书我们已经导入过了,如果不提供,它还会自动生成失败.
总结
不知道Sitecore 9为什么采用脚本安装, 明显感觉安装过程麻烦了许多, 此次安装过程中最大难点在证书的生成, 很多人都遇到了这个问题,
Sitecore是怎么测试的(没有测试windows 8.1)? 还有一点就是sitecore 目前还不支持Solr-7.1为什么不提出来?
如果下载了solr-7.1即使解决了证书的问题, 后面还有许多问题,比如配置文件名称不一致, 数据类型不配置, 返回格式不匹配...
还没有人评论,抢个沙发吧...