写个搭建个真正的网站后进行的分流吧
v2ray +tls + websocket + nginx 配置与使用
说明
- 2018年初的时候,三台使用SS(SSR)的小鸡都被墙了, 不过在3, 4月份的时候这三台小鸡又都被放出来了, 哈哈,
- 于是就开始了解v2ray, v2ray + tls + websocket + nginx 据有更强的抗干扰性,
- 网上已经有很多相关介绍了, 本文也只是起到记录作用, 方便下次部署,
- 本文不是零基础,默认你已经购买了VPS, 熟悉基本的LINUX命令
引用
- https://www.v2ray.com/
- https://steemit.com/v2ray/@laosan/v2ray-websocket-ws-tls-nginx-bbr-cdn-wordpress
- https://certbot.eff.org/
步骤
- v2ray 服务器端安装及配置
- nginx 安装及配置
- v2ray 客户端使用
v2ray 服务器端安装及配置
假设域名 test.v2ray.com 指向你的VPS ip地址
参考官方安装
https://v2ray.com/chapter_00/install.html
Linux 安装脚本
V2Ray 提供了一个在 Linux 中的自动化安装脚本。这个脚本会自动检测有没有安装过 V2Ray,如果没有,则进行完整的安装和配置;如果之前安装过 V2Ray,则只更新 V2Ray 二进制程序而不更新配置。
以下指令假设已在 su 环境下,如果不是,请先运行 sudo su。
运行下面的指令下载并安装 V2Ray。当 yum 或 apt-get 可用的情况下,此脚本会自动安装 unzip 和 daemon。这两个组件是安装 V2Ray 的必要组件。如果你使用的系统不支持 yum 或 apt-get,请自行安装 unzip 和 daemon
bash <(curl -L -s https://install.direct/go.sh)
此脚本会自动安装以下文件:
/usr/bin/v2ray/v2ray:V2Ray 程序;/usr/bin/v2ray/v2ctl:V2Ray 工具;/etc/v2ray/config.json:配置文件;/usr/bin/v2ray/geoip.dat:IP 数据文件/usr/bin/v2ray/geosite.dat:域名数据文件
此脚本会配置自动运行脚本。自动运行脚本会在系统重启之后,自动运行 V2Ray。目前自动运行脚本只支持带有 Systemd 的系统,以及 Debian / Ubuntu 全系列。
运行脚本位于系统的以下位置:
/etc/systemd/system/v2ray.service: Systemd/etc/init.d/v2ray: SysV
脚本运行完成后,你需要:
编辑 /etc/v2ray/config.json 文件来配置你需要的代理方式;
运行 service v2ray start 来启动 V2Ray 进程;
之后可以使用 service v2ray start|stop|status|reload|restart|force-reload 控制 V2Ray 的运行。
服务器v2ray配置文件
{
  "log" : {
    "access": "/var/log/v2ray/access.log",
    "error": "/var/log/v2ray/error.log",
    "loglevel": "warning"
  },
  "inbound": {
    "port": 10000, //(此端口与nginx配置相关)
    "listen": "127.0.0.1",
    "protocol": "vmess",
    "settings": {
      "clients": [
        {
          "id": "461aad1f-687c-4188-9abc-80073a618ca3", //你的UUID, 此ID需与客户端保持一致
          "level": 1,
          "alterId": 64 //此ID也需与客户端保持一致
        }
      ]
    },
   "streamSettings":{
      "network": "ws",
      "wsSettings": {
           "path": "/ray" //与nginx配置相关
      }
   }
  },
  "outbound": {
    "protocol": "freedom",
    "settings": {}
  },
  "outboundDetour": [
    {
      "protocol": "blackhole",
      "settings": {},
      "tag": "blocked"
    }
  ],
  "routing": {
    "strategy": "rules",
    "settings": {
      "rules": [
        {
          "type": "field",
          "ip": [
            "0.0.0.0/8",
            "10.0.0.0/8",
            "100.64.0.0/10",
            "127.0.0.0/8",
            "169.254.0.0/16",
            "172.16.0.0/12",
            "192.0.0.0/24",
            "192.0.2.0/24",
            "192.168.0.0/16",
            "198.18.0.0/15",
            "198.51.100.0/24",
            "203.0.113.0/24",
            "::1/128",
            "fc00::/7",
            "fe80::/10"
          ],
          "outboundTag": "blocked"
        }
      ]
    }
  }
}
v2ray的JSON配置文件, 支持单行注释//, 和多行注释/* / *
**上面的服务器配置文件也简单注释说明,关于nginx相关的后台会介绍
v2ray 客户端配置文件
{
  "log": {
    "loglevel": "warning"
  },
  "inbound": {
    "port": 1080,
    "listen": "127.0.0.1",
    "protocol": "socks",
    "settings": {
      "auth": "noauth",
      "udp": false
    }
  },
  "inboundDetour": [
    {
        "port": 8123,
        "listen": "127.0.0.1",
        "protocol": "http",
        "settings": {}
    }
  ],
  "outbound": {
    "protocol": "vmess",
    "settings": {
      "vnext": [{
        "address": "test.v2ray.com", // 服务器地址,请修改为你自己的服务器 ip 或域名
        "port": 443,  // 服务器端口
        "users": [{
            "id": "461aad1f-687c-4188-9abc-80073a618ca3", //你的UUID, 此ID需与服务端保持一致
            "level": 1,
            "alterId": 64,  //此ID也需与客户端保持一致
            "security": "aes-128-gcm"
        }]
      }]
    },
    "streamSettings":{
        "network": "ws",
        "security": "tls",
        "tlsSettings": {
            "serverName": "test.v2ray.com" //此域名是你服务器的域名
        },
        "wsSettings": {
            "path": "/ray" //与服务器配置及nginx配置相关
        }
    },
    "tag": "forgin"
  },
  "outboundDetour": [
    {
        "protocol": "freedom",
        "settings": {},
        "tag": "direct"
    }
  ],
  "routing": { //此路由配置是自动分流, 国内IP和网站直连
    "strategy": "rules",
    "settings": {
        "domainStrategy": "IPIfNonMatch",
        "rules": [
            {
                "type": "chinaip",
                "outboundTag": "direct"
            },
            {
                "type": "chinasites",
                "outboundTag": "direct"
            },
            {
                "type": "field",
                "ip": [
                    "0.0.0.0/8",
                    "10.0.0.0/8",
                    "100.64.0.0/10",
                    "127.0.0.0/8",
                    "169.254.0.0/16",
                    "172.16.0.0/12",
                    "192.0.0.0/24",
                    "192.0.2.0/24",
                    "192.168.0.0/16",
                    "198.18.0.0/15",
                    "198.51.100.0/24",
                    "203.0.113.0/24",
                    "::1/128",
                    "fc00::/7",
                    "fe80::/10"
                ],
                "outboundTag": "direct"
            }
        ]
    }
  },
  "policy": {
    "levels": {
      "0": {"uplinkOnly": 0}
    }
  }
}
Nginx 配置
linux 下的nginx安装就不介绍了, 不清楚的, 可以google 一下
以下是nginx 部分配置, 当然此配置不影响你现在有nginx服务, 只是添加了一个 location /ray.
server {
    # SSL configuration
    listen 443 ssl http2 default_server;
    listen [::]:443 ssl http2 default_server;
    ssl_certificate /ssl.pem; #你的ssl证书, 如果第一次,可能还需要自签一下,
    ssl_certificate_key /ssl.key; #你的ssl key

    root /var/www/html;

    # Add index.php to the list if you are using PHP
    index index.html index.htm index.nginx-debian.html;

    server_name test.v2ray.com; #你的服务器域名

    location /ray { #/ray 路径需要和v2ray服务器端,客户端保持一致
        proxy_redirect off;
        proxy_pass http://127.0.0.1:10000; #此IP地址和端口需要和v2ray服务器保持一致,
        proxy_http_version 1.1;
        proxy_set_header Upgrade $http_upgrade;
        proxy_set_header Connection "upgrade";
        proxy_set_header Host $http_host;
    }
}
关于域名ssl 证书,使用certbot自动签一个let's encrypt证书就行了, 很简单,参考链接: https://certbot.eff.org/
成功后, 在crontab 中添加一条任务计划每三个月执行一次,因为let's encrypt证书三个月过期,
0 0 15 */3 * /root/certbot/certbot-auto renew #在3,6,9,12月份的15号零点零分执行更新
v2ray 客户端的使用
v2ray 客户端主要还在windows上使用, 需要手动编辑config.json文件, 好像还不支持多服务器配置(好久没用了,不知道现在是否可以)
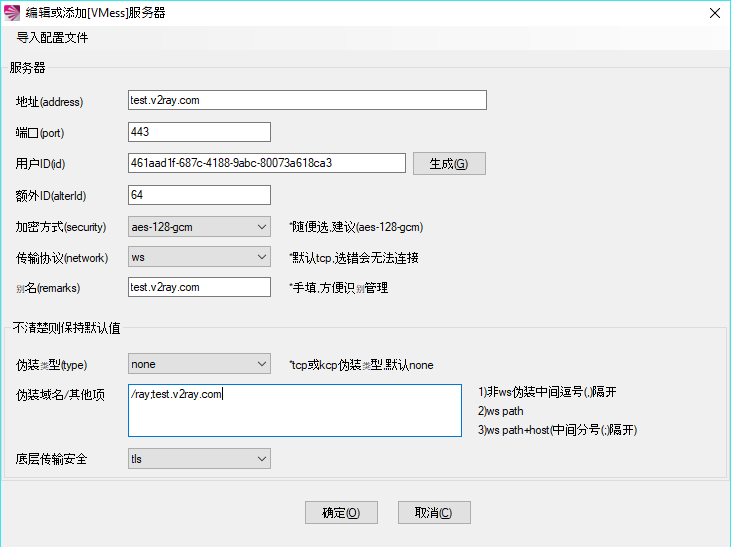
推荐使用界面化v2rayN https://github.com/2dust/v2rayN, 在release页面下载一个v2rayN.exe放在 v2ray客户端文件夹里就行了。
v2rayN使用websocket(ws)时一点需要注意,伪装域名/其选项,应该如下填写
/ray;test.v2ray.com #请更换为自己的相关配置
其它配置请参考截图

总结
v2ray 的配置相对于ss(ssr)还是复杂一点,其中还涉及到nginx的使用,及ssl证书管理等, 也许需要多一点时间和精力去了解一下, 多看看,
使用效果来说,基本和ss(ssr)差别不大,最主要还是跟服务器相关,相对来说更稳定一些,自从小鸡被放出来后, 就一直使用v2ray,还没有再被墙, 哈哈。
后续再介绍一下v2ray 免流,地址: v2ray 免流 配置
发表评论
评论
大佬,这种配置在v2ray服务器端有如下报错日志,但不影响使用
2019/12/21 12:27:57 [Info] [2035986994] v2ray.com/core/app/proxyman/inbound: connection ends > v2ray.com/core/proxy/vmess/inbound: connection ends > context canceled
2019/12/21 12:27:57 [Info] [3381371742] v2ray.com/core/app/proxyman/outbound: failed to process outbound traffic > v2ray.com/core/proxy/freedom: connection ends > context canceled
2019/12/21 12:27:57 [Info] [3381371742] v2ray.com/core/app/proxyman/inbound: connection ends > v2ray.com/core/proxy/vmess/inbound: connection ends > io: read/write on closed pipe
2019/12/21 12:27:57 [Info] [2569723756] v2ray.com/core/app/proxyman/outbound: failed to process outbound traffic > v2ray.com/core/proxy/freedom: connection ends > context canceled
2019/12/21 12:27:57 [Info] [2569723756] v2ray.com/core/app/proxyman/inbound: connection ends > v2ray.com/core/proxy/vmess/inbound: connection ends > io: read/write on closed pipe
2019/12/21 12:27:57 [Info] [3102410341] v2ray.com/core/app/proxyman/outbound: failed to process outbound traffic > v2ray.com/core/proxy/freedom: connection ends > context canceled
2019/12/21 12:27:57 [Info] [3102410341] v2ray.com/core/app/proxyman/inbound: connection ends > v2ray.com/core/proxy/vmess/inbound: connection ends > io: read/write on closed pipe
2019/12/21 12:27:57 [Info] [1418023585] v2ray.com/core/app/proxyman/outbound: failed to process outbound traffic > v2ray.com/core/proxy/freedom: connection ends > context canceled
2019/12/21 12:27:57 [Info] [1418023585] v2ray.com/core/app/proxyman/inbound: connection ends > v2ray.com/core/proxy/vmess/inbound: connection ends > io: read/write on closed pipe
2019/12/21 12:27:57 [Info] [3896914288] v2ray.com/core/app/proxyman/outbound: failed to process outbound traffic > v2ray.com/core/proxy/freedom: connection ends > context canceled
2019/12/21 12:27:57 [Info] [3896914288] v2ray.com/core/app/proxyman/inbound: connection ends > v2ray.com/core/proxy/vmess/inbound: connection ends > context canceled
大佬,请问访问谷歌打印以下错误,这是哪里错了呢?
2020/02/14 02:29:29 [Warning] v2ray.com/core: V2Ray 4.9.0 started
2020/02/14 02:29:44 tcp:127.0.0.1:57748 accepted tcp:www.google.com:443
2020/02/14 02:30:14 [Warning] failed to handler mux client connection > v2ray.com/core/proxy/vmess/outbound: failed to find an available destination > v2ray.com/core/common/retry: [v2ray.com/core/transport/internet/websocket: failed to dial WebSocket > v2ray.com/core/transport/internet/websocket: failed to dial to (wss://v2ray.goldrepo.com:10486/v2ray): > dial tcp 47.240.35.41:10486: connectex: A connection attempt failed because the connected party did not properly respond after a period of time, or established connection failed because connected host has failed to respond. v2ray.com/core/transport/internet/websocket: failed to dial WebSocket > v2ray.com/core/transport/internet/websocket: failed to dial to (wss://v2ray.goldrepo.com:10486/v2ray): > dial tcp 47.240.35.41:10486: connectex: No connection could be made because the target machine actively refused it.] > v2ray.com/core/common/retry: all retry attempts failed
请大佬明示?